TeamDynamix Mappings
Use this function to view and add TeamDynamix property mapping information. After saving the TeamDynamix credentials in Virima, a set of predefined mappings is automatically loaded on the TeamDynamix Mappings page. These mappings define how Virima blueprints and attributes correspond to TeamDynamix CI Types and attributes, ensuring accurate synchronization between the two systems.
Loading All TeamDynamix Mappings and Properties in Virima
Automatic Fetching on Credential Save
When TeamDynamix credentials are saved in Virima for the first time:
Virima fetches all available TeamDynamix CI Types and their attributes (fields) from the connected TDX org.
This information is stored in Virima's internal database tables.
A set of default attribute mappings is auto-seeded — one mapping record per TDX CI Type (typically 16 mappings for a standard TDX org: Windows Host, Windows Server, Linux Server, Desktop, Laptop, Virtual Machine, Network Device, Switch, Router, Firewall, Application, Application Server, Database Server, Storage Server, Printer, ESXi Host).
Availability in Admin Mapping Page
When you go to Admin > Integrations > TeamDynamix > Mappings to create or edit a mapping:
All available TeamDynamix CI Types and their attributes are ready for mapping without manual entry.
Each mapping is shown as Enabled by default and includes a pre-populated set of attribute pairs.
Opening TeamDynamix Mapping Before Adding Credentials
When you open the TeamDynamix Mapping page in Virima before adding TDX credentials:
An alert is displayed: "TeamDynamix credentials are not configured."
This prevents you from proceeding with mapping until valid credentials are provided.
After Adding TeamDynamix Credentials
Once you add and save your TeamDynamix credentials (domain, username, and password) in Admin > Integrations > TeamDynamix Credentials:
Virima establishes API connectivity and fetches all TDX CI Types and attributes.
When you open the TeamDynamix Mapping page, all TDX CI Types and attributes are visible for mapping. You can create, view, or edit mappings between Virima blueprints and TDX attributes.
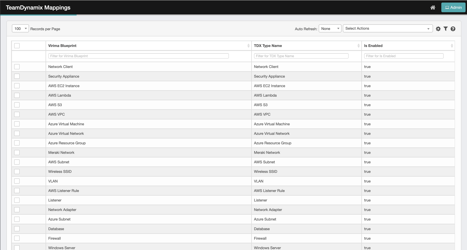
Accessing TeamDynamix Mappings
|
1.
|
Navigate to Admin > Integrations > TeamDynamix Mappings. |
|
2.
|
On the TeamDynamix Mappings page, review the predefined list of mappings between Virima and TeamDynamix CI Types. |
|
3.
|
Choose any desired Blueprint (CI) from the available list. |
|
4.
|
In the TeamDynamix Attribute Mappings section, review the attribute-level mappings: |
Virima Property: The attribute in Virima's CMDB.
TeamDynamix Attribute: The corresponding target field in TeamDynamix.
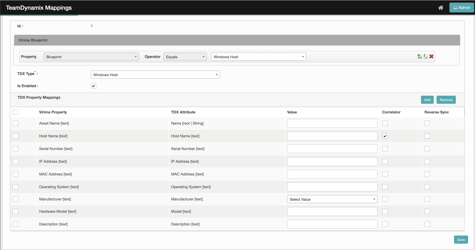
Example: Windows Host Mapping
For the Windows Host blueprint, the mapping page shows how Virima properties (such as Host Name, IP Address, MAC Address, Operating System, Serial Number, Manufacturer, Model) map to TeamDynamix attributes on the Windows Host CI Type.
This ensures that when CIs are synced, the correct Virima attributes are placed in the right TeamDynamix attribute fields.
Key Elements in the Mapping Page
When viewing or creating TeamDynamix mappings in Virima, the following elements appear:
Blueprint Name — Defines the type of configuration item (CI) being mapped (for example, Windows Host). Ensures the correct attributes are used for mapping.
TeamDynamix CI Type — Specifies the target CI Type in TeamDynamix where the CI data is stored. For example, Windows Host, Linux Server, Network Device.
Is Enabled — Toggle that determines whether a specific mapping is active or inactive. When Enabled, the mapping is considered valid and applied during sync. When Disabled, CIs of this type are silently skipped during a Copy to TeamDynamix action.
Correlator Field — When Correlator is selected, it validates for duplicate values. Only one value is copied/moved. If duplicates include empty values, the sync fails for that property.
Reverse Sync — Selected when you want to copy values from TDX to Virima for the mapped property during synchronization.
TeamDynamix Attribute Mappings Table — Displays Virima Property (left column) and the corresponding TeamDynamix Attribute (right column). Each row represents a mapped attribute between Virima and TeamDynamix.
Actions (Add/Remove Buttons) — Add maps additional Virima properties to TeamDynamix attributes. Remove deletes an existing attribute pair from the mapping.
Save Button — Commits the mappings so they are applied in future synchronization runs.

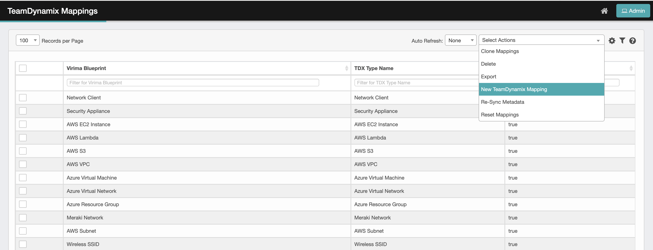
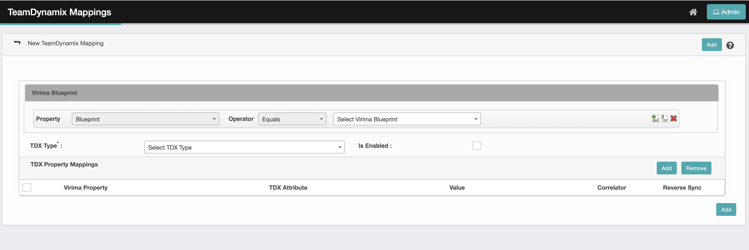
 New TeamDynamix Mapping
|
1.
|
Navigate to Select Actions > New TeamDynamix Mapping. |
|
2.
|
Select the Blueprint Name. Choose a Virima Blueprint (for example, Windows Host or Linux Server). This determines which CI type the mapping applies to. |
|
3.
|
Is Enabled determines whether a specific mapping is active or inactive. When enabled, the mapping is considered valid and applied during TeamDynamix synchronization. When disabled, the mapping is ignored or skipped and the CI fails to Copy to TeamDynamix. |
|
4.
|
Select the TeamDynamix Type. Pick the TeamDynamix CI Type where the CI data should be stored. This ensures correct synchronization into the target TDX CI Type. |
|
5.
|
Set the Correlator Field. When Correlator is selected, it validates for duplicate values. Only one value is copied/moved. If duplicates include empty values, the sync fails for that property. |
|
6.
|
Define Attribute Mappings. In the TeamDynamix Attribute Mappings section, select the Virima Property and the corresponding TeamDynamix Attribute. Click Add to include more attribute pairs. |
|
7.
|
Select the Reverse Sync checkbox when you want to copy values from TDX to Virima for the mapped property during synchronization. |
|
8.
|
Click Save to apply the configuration. The new mapping is used for syncing data between Virima and TeamDynamix. |
Edit TeamDynamix Mapping
|
1.
|
In the main window, select the applicable record. The mappings window displays and contains a list of all current property mappings. |
|
2.
|
Hover over the line item containing the mapping to edit. |
|
3.
|
Make the necessary changes in the TeamDynamix Attribute field. |
|
4.
|
When all selections and entries are made, click Save. |
Delete TeamDynamix Mapping
|
1.
|
Open TeamDynamix Mappings. |
|
2.
|
Select the records you want to remove. |
|
3.
|
From Select Actions, choose Delete. |
|
4.
|
Type "Delete" and click Delete to confirm the deletion when prompted. |
Clone TeamDynamix Mapping
|
1.
|
Open TeamDynamix Mappings. |
|
2.
|
Select the records you want to duplicate. |
|
3.
|
From Select Actions, choose Clone Mappings. |
|
4.
|
The selected mappings are copied and added as new records (Mapped Record). |
Re-Sync Metadata
|
1.
|
Open TeamDynamix Mappings. |
|
2.
|
From Select Actions, choose Re-Sync Metadata. |
|
3.
|
Virima re-fetches the latest CI Types and attribute definitions from TeamDynamix to ensure mapping options are current. |
Note: Re-Sync Metadata does not reset existing attribute pair mappings. It only refreshes the available list of TDX CI Types and attributes. Use this action when:
The TDX admin has added new CI Types in TeamDynamix.
TDX attribute schemas have changed.
Initial seeding failed or produced incomplete mappings.
Reset Mappings
|
1.
|
Open TeamDynamix Mappings. |
|
2.
|
From Select Actions, choose Reset Mappings. |
|
3.
|
All mappings are reset to default configuration. Use this option to discard custom changes and restore the auto-seeded defaults. |
Other Functions and Page Elements