TeamDynamix Credentials
Virima integrates with TeamDynamix (TDX) for bi-directional exchange of CI data and supports automated ITSM workflows. Current API integrations occur between the following Virima and TeamDynamix functions/processes:
Virima CMDB to TeamDynamix Configuration Items
Virima CMDB to TeamDynamix Incident Management
Virima CMDB to TeamDynamix Change Management
TeamDynamix CI data back to Virima (Reverse Sync)
Use this function to configure TeamDynamix credentials for integration to the application.
Prerequisites
Before initiating the integration, ensure you have the following:
A valid TeamDynamix username
Your TeamDynamix instance domain URL (must start with https://, e.g., https://partner10.teamdynamix.com)
A valid TeamDynamix password
The TeamDynamix module enabled on your Virima tenant subscription
Network connectivity from the Virima application server to the TDX domain over HTTPS (port 443)
Accessing TeamDynamix Credentials
To set up a connection between Virima and TeamDynamix:
|
2.
|
Go to Admin > Integrations. |
|
3.
|
Select TeamDynamix Credentials. |
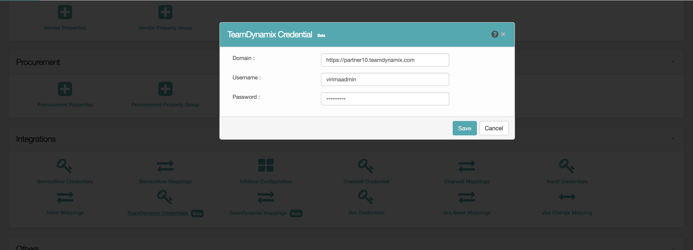
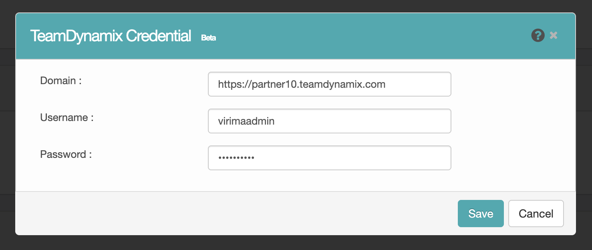
Entering TeamDynamix Credentials
After opening the TeamDynamix Credentials page in Virima, enter the following details:
|
1.
|
In the Domain field, enter your TeamDynamix instance URL (for example, https://partner10.teamdynamix.com). The domain must start with https:// or a validation error is shown. |
|
2.
|
In the Username field, enter your TeamDynamix admin or service account user name. |
|
3.
|
In the Password field, enter the TeamDynamix password for this account (masked input). |
|
4.
|
Click Save to store the credentials. |
When TeamDynamix credentials are saved, clicking Save triggers the following automatic actions:
Establishes API connectivity between Virima and TeamDynamix.
Fetches all CI Types registered in the connected TDX org.
Fetches all attributes for each CI Type.
Auto-seeds default attribute mappings so administrators can begin syncing immediately without manual mapping setup.
Marks the integration as active and reveals the Copy to TeamDynamix action in the CMDB module.
Handling TeamDynamix Connectivity Failures
If the Virima application server cannot reach the TeamDynamix domain (firewall block, DNS issue, or TDX outage):
Saving credentials succeeds, but the metadata fetch fails with a ConnectException.
Subsequent sync attempts create a Sync Log entry that remains in "In Progress" state.
To recover: Restore network connectivity to the TDX domain (verify port 443 access to *.teamdynamix.com), and then re-trigger Re-Sync Metadata from the Mappings page.
Adding Incidents for Copied CIs
To create a TeamDynamix incident from a copied CI:
|
1.
|
Open the copied CI in Virima. |
|
3.
|
Select the TeamDynamix radio button and click New Incident. |
|
4.
|
You are redirected to the Incident page in TeamDynamix. |
|
5.
|
Complete all required details. |
|
6.
|
In the Configuration Item field, search for the CI. |
|
7.
|
Click Save to submit the incident. |
The incident appears under the Incident section in Virima ITSM.
Adding Changes for Copied CIs
To create a TeamDynamix change request from a copied CI:
|
1.
|
Open the copied CI in Virima. |
|
2.
|
Go to the ITSM tab and select Changes. |
|
3.
|
Select the TeamDynamix radio button and click New Change. |
|
4.
|
You are redirected to the Change page in TeamDynamix. |
|
5.
|
Complete the required details. |
|
6.
|
In the Configuration Item field, search for the CI. |
|
7.
|
Click Save to submit the change request. |
The change appears under the Change section in Virima ITSM.
Viewing CIs in the BSM View
Once incidents and changes are created for a CI, they are also visible in the Virima Business Service Mapping (BSM) view, providing end-to-end visibility of the CI and its related ITSM activities.
Scheduling Copy Workflows
To automate CI copy actions on a recurring schedule:
|
1.
|
Navigate to Business Rule in your application. |
|
2.
|
Select CMDB as the module. |
|
3.
|
Enter all required details for the business rule. |
|
4.
|
Associate the Blueprints that need to be copied. |
|
5.
|
Set Execute On to Schedule. |
|
6.
|
Configure the schedule (time-based trigger such as nightly at 2 AM, or every 6 hours). |
|
7.
|
Click Add Condition to specify triggering criteria (for example, only newly discovered CIs, or CIs in a specific category). |
|
8.
|
Set Action Type to Copy to TeamDynamix. |
|
9.
|
Click Add to save the workflow. |
Once saved, the rule automatically triggers copy actions at the scheduled time, keeping the TDX CMDB in step with Virima's discovered network state without manual admin action.
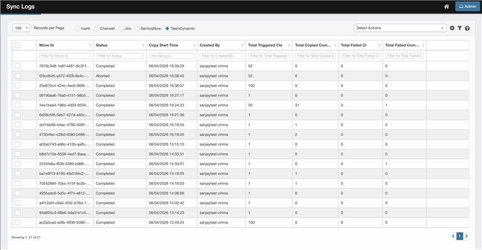
Monitoring TeamDynamix Sync
During synchronization, progress and status can be tracked on the Sync Logs page. The Sync Logs page provides the following details:
Move Id — A unique UUID for each sync operation.
Status — In Progress, Completed, or Failed.
Copy Start Time — When the sync was triggered.
Copy End Time — When the sync finished (blank if still running or catastrophically failed).
Created By — The Virima user who triggered the sync.
Total Triggered CIs — Number of total triggered CIs.
Total Copied — Number of CIs successfully pushed to TeamDynamix.
Total Failed — Number of CIs that failed to copy.
Total incomplete CIs — If a CI has components and fails to copy to TDX, the main CI of the component appears here.
All sync activities are recorded, enabling administrators to monitor the state and health of current and past sync operations.
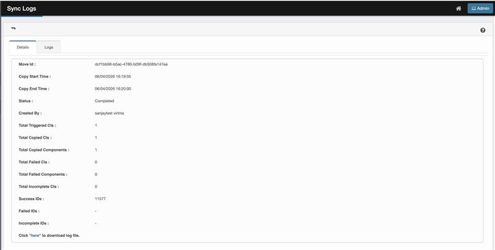
To open TeamDynamix sync logs:
|
1.
|
Navigate to Configuration Management > Sync Logs. |
|
2.
|
Select the TeamDynamix radio button. |
|
3.
|
Open the log entry for recently synced CIs to review details such as Total Triggered CIs, Total Copied CIs, Total Failed CIs, Total incomplete CIs, and per-CI status (if drilldown is available). |
Sync Log Behavior Notes
A sync log entry is created when the sync is triggered, with status "In Progress". This ensures a log exists even if the sync fails unexpectedly.
On normal completion, the status updates to "Completed" with final counts.
If a partial failure occurs (for example, 45 of 50 CIs succeed), the status is "Completed" with Total Copied = 45 and Total Failed = 5.
If the Virima server cannot reach TeamDynamix (network or DNS issue), the log may remain in "In Progress" state. In this case, restore connectivity and re-trigger the sync.
Summary of Integration Steps
The Virima-TeamDynamix integration enables seamless synchronization of configuration item (CI) data and supports automated ITSM workflows. Key integration steps:
Save TeamDynamix credentials (Domain, Username, and Password) in Virima.
On save, Virima automatically fetches all TDX CI Types and attributes and seeds default mappings.
Review and customize CI attribute mappings to align Virima blueprints with TeamDynamix CI Types.
Set the Correlator Field for each mapping to prevent duplicate asset creation in TDX.
Copy CIs from Virima to TeamDynamix from the CMDB list or CI detail page.
Validate copied records in TeamDynamix Assets.
Monitor sync runs through the Sync Logs page (Move Id, status, counts, timestamps).
Create and manage incidents and change requests for synchronized CIs directly from the Virima ITSM tab.
View CI-to-ticket relationships in the BSM view.
Automate recurring pushes through Business Rule schedules.
Related Topics
TeamDynamix Mappings