Meraki Import
Add a schedule
-
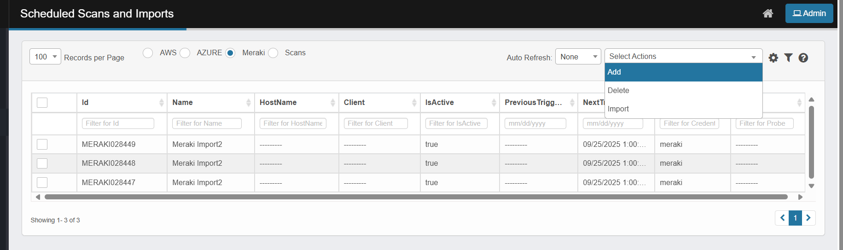
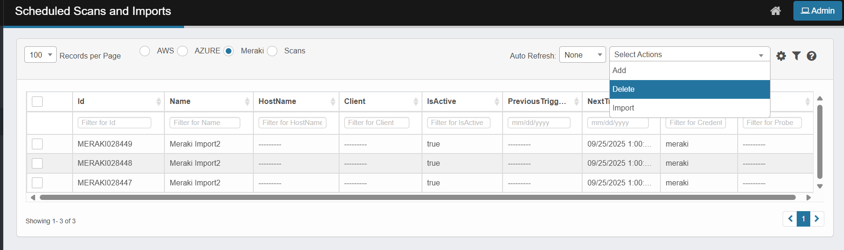
Go to Discovery → Scheduled Scans and Imports and select the Meraki tab.
-
Select Actions → Add.
-
Fill the header:
-
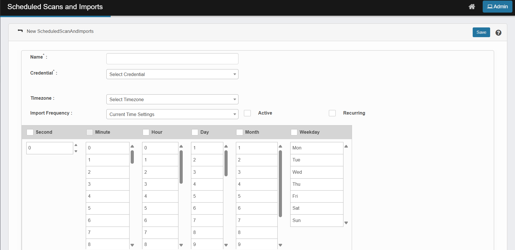
Name*: e.g., Meraki Import – Org A.
-
Credential*: pick your Meraki API credential.
-
Timezone: choose the correct region.
-
Import Frequency: leave Current Time Settings and set the wheels below, or change it and still use the wheels.
-
Toggle Active (must be ON to execute a scan) and Recurring if you want it to repeat.
-
Note: Meraki has no per-service checkboxes—your credential controls what’s pulled (orgs/networks/devices the key can see).
-
-
Use the time wheels (Second / Minute / Hour / Day / Month / Weekday) to schedule.
-
Save. The job appears in the Meraki list with IsActive=true and a NextTriggerTime.
Import Meraki schedules
-
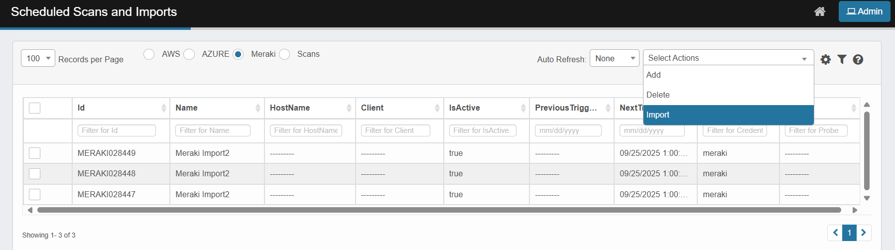
In the Meraki tab, open Select Actions → Import.
-
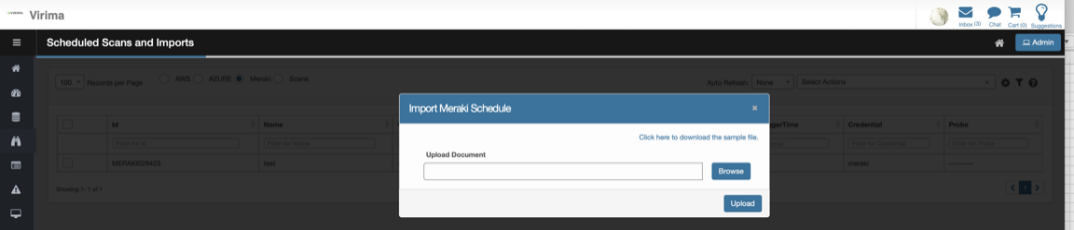
You’ll see the Import Meraki Schedule popup with a Browse button and a link to Click here to download the sample file.
-
Download template: In the Import Meraki Schedule popup, click the link to download the sample file.
Prepare Your File
-
Headers: Keep the headers exactly as shown in the sample file.
-
Fill in mandatory fields:
-
Name Must contain a string.
-
Credentials Enter Credential Name or Credential ID of Meraki Account
-
Imported Items to be imported, must be separated by commas
-
Timezone
-
Schedule fields: second, minute, hour, day, month, weekday
-
-
Fill in optional/additional fields as required:
-
Active: true/false
-
Recurring: true/false
-
Import the File
-
Click Select Actions → Import.
-
In the popup:
-
Click Browse.
-
Select your prepared file.
-
Click Upload.
-
-
Close the dialog.
Verify Imported Schedule
-
The scheduled jobs will appear in the list/grid.
-
If IsActive = true, the system will automatically calculate and display NextTriggerTime.
-
All other relevant columns (including credentials) will be populated.
Delete a Meraki schedule
-
Tick the checkbox for each Meraki schedule you want to remove.
-
Select Actions → Delete.
-
In Delete Confirmation, type Delete exactly, then click Delete.
-
The selected rows disappear from the grid.
-
No imports will be executed from the point of delete
-
If an active import is currently running, The import will be completed
Additional notes on Excel import behavior
When importing scan records using an Excel sheet, the following conditions and behaviors apply:
-
Past timestamps are ignored
-
If the timestamp specified in the Excel sheet is a past date/time, that record will not be imported. The system will skip the record to avoid scheduling outdated scans.
-
-
Active status handling
-
If the Active status in the Excel sheet is set to true, the record will be stored and a scan shall be triggered at the scheduled time
-
If the Active status is set to false or left blank, the record will be stored but a scan will not be triggered
-
-
Recurring flag behavior
-
If the Recurring field is set to true, the system treats it as a recurring scan scheduled every year, and the value is stored in the DB as *.
-
If the Recurring field is set to false or left blank, the scan is treated as current year only.
-
-
Client status requirement
-
The scan record will only be imported if the associated client is active. If the client is inactive or not properly configured, the system will not import the record.
-
-
Time component validation
-
If the minute field is set to *, the system will not import the record.
-
If the day field is set to *, it will be interpreted as every day.
-
If the hour field is set to *, it will be interpreted as every hour.
-
If the month field is set to *, it will be interpreted as every month.
-
If the weekdays field is set to *, it will be interpreted as every week.
-
You can use either the month or weekdays field — not both simultaneously.
-
Only numeric values are accepted in the month and weekdays fields. Alphabetic representations (e.g., "Jan", "Mon") are not allowed and will result in import failure.
|
Condition |
Excel Import Behavior |
Manual UI Behavior |
|
Past Schedule Time |
Record skipped silently |
Alert message: "Enter a proper schedule time." |
-
Cron Expression (human-readable)
-
This line summarizes the schedule you build with the wheels below (e.g., “at 2, 5 and 6 minutes at 0, 2, 3, 6 and 7 hours”).
-
Treat it as a preview: changing the wheels updates this text. Use it to sanity-check your schedule.
-