Azure Import
Adding a schedule
-
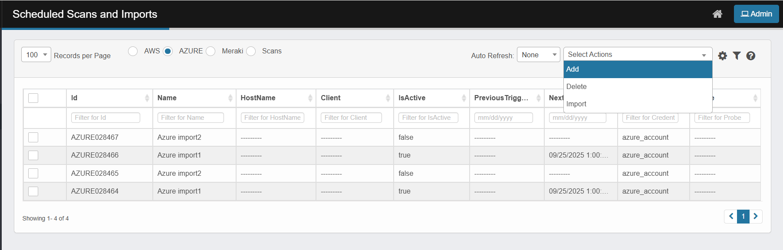
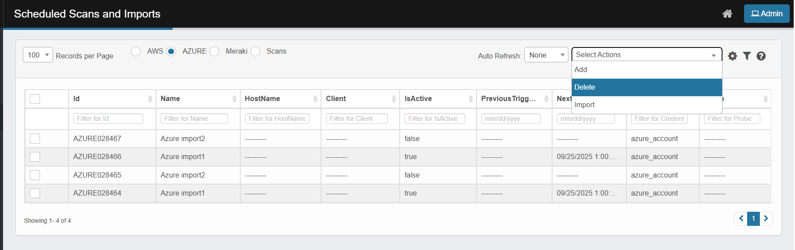
At the top of Scheduled Scans and Imports, choose AZURE → Select Actions → Add.
-
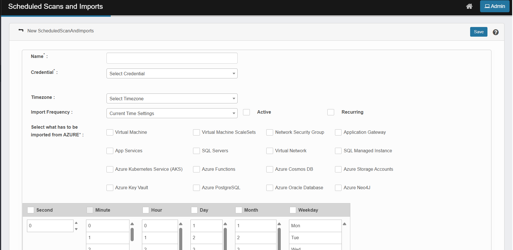
Fill the header:
-
Name*: e.g., Azure import – nightly.
-
Credential*: pick your azure_account.
-
Timezone: select the correct region.
-
Import Frequency: keep Current Time Settings or adjust with the wheels below.
-
Toggle Active (must be ON to scheduled import) and optionally Recurring.
-
-
Under Select what has to be imported from AZURE*, tick at least one service (only choose what you need):
-
Virtual Machine, Virtual Machine ScaleSets, Network Security Group, Application Gateway,
-
App Services, SQL Servers, Virtual Network, SQL Managed Instance,
-
Azure Kubernetes Service (AKS), Azure Functions, Azure Cosmos DB, Azure Storage Accounts,
-
Azure Key Vault, Azure PostgreSQL, Azure Oracle Database, Azure Neo4J.
-
-
Set the schedule with the time wheels (Second / Minute / Hour / Day / Month / Weekday).
-
Click save
-
Close the dialog. The scheduled import shall appear in the list.
-
if IsActive, is true, then NextTriggerTime is calculated and displayed
-
All other columns including credential shall be populated
-
Importing a Azure Schedule
-
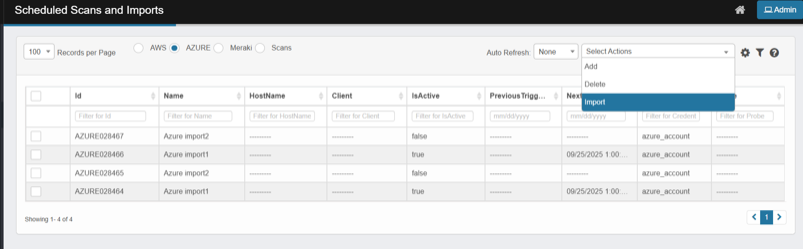
Open Select Actions, and click Import.
-
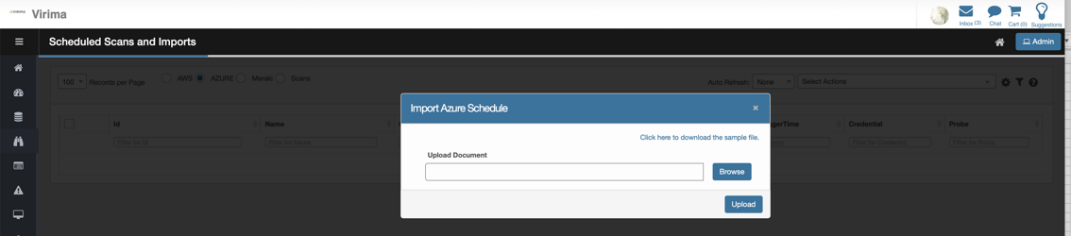
You’ll see the Import Azure Schedule popup with a Browse button and a link to Click here to download the sample file.
-
Download template: In the Import Azure Schedule popup, click the link to download the sample file.
Prepare Your File
-
Headers: Keep the headers exactly as shown in the sample file.
-
Fill in mandatory fields:
-
Name Must contain a string.
-
Credentials Enter Credential Name or Credential ID of Azure Account
-
Imported Items to be imported, must be separated by commas
-
Timezone
-
Schedule fields: second, minute, hour, day, month, weekday
-
-
Fill in optional/additional fields as required:
-
Active: true/false
-
Recurring: true/false
-
Import the File
-
Click Select Actions → Import.
-
In the popup:
-
Click Browse.
-
Select your prepared file.
-
Click Upload.
-
-
Close the dialog.
Verify Imported Schedule
-
The scheduled jobs will appear in the list/grid.
-
If IsActive = true, the system will automatically calculate and display NextTriggerTime.
-
All other relevant columns (including credentials) will be populated.
Deleting a Azure Schedule
-
Select the checkbox in the leftmost column for each schedule you want to remove.
-
From the Select Actions dropdown, click Delete.
-
A Delete Confirmation modal appears.
-
In the confirmation box, type Delete (exactly as shown), then click Delete.
The selected schedule(s) are removed and disappear from the grid. -
No imports will be executed from the point of delete
-
If an active import is currently running, The import will be completed