Configuring a Discovery Scan
Configure the parameters below:
-
Name
Enter a unique name for the scan. -
Probe: Select the appropriate probe type for your environment and scan objectives (see detailed probe options in the full documentation).
-
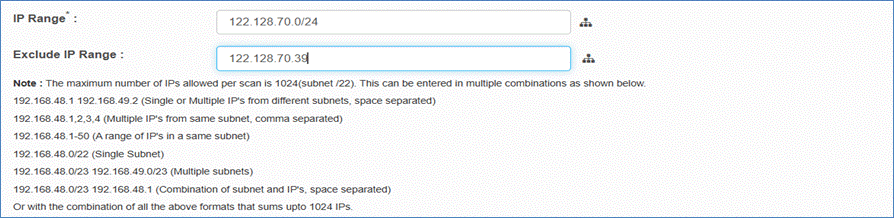
IP Range
Define the network segment to scan.
Supported formats:-
Single IP: 192.168.48.1
-
Multiple IPs: 192.168.48.1 192.168.49.2
-
Range: 192.168.48.1-50
-
CIDR: 192.168.48.0/24
-
Multiple subnets: 192.168.48.0/24 192.168.49.0/24
-
-
Click the subnet icon next to the IP range field to automatically populate the subnet where the selected client (Discovery Application) is installed
-
Exclude IP Range (Optional)
-
Add IP addresses or ranges to exclude from the scan.
-
Use the same format as the IP Range field.
-
-
Location
-
CI(s) discovered as part of this scan is associated with the selected location
-
-
Scan Type
-
Immediate: Runs the scan instantly.
-
Scheduled: Opens scheduling options (see below).
-

-
Scheduled Scan Details
-
If scheduled, set:
-
Time Zone
-
Schedule: Second, Minute, Hour, Day, Month, Weekday
(Choose either Day or Weekday, not both) -
Active: Enable/disable the schedule.
-
Recurring: Enable for repeated scans (yearly)
-
-
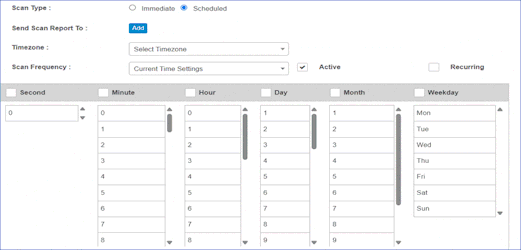
Please select only one: either the Day field or the Weekday field — not both.
-
Send Scan Report To
-
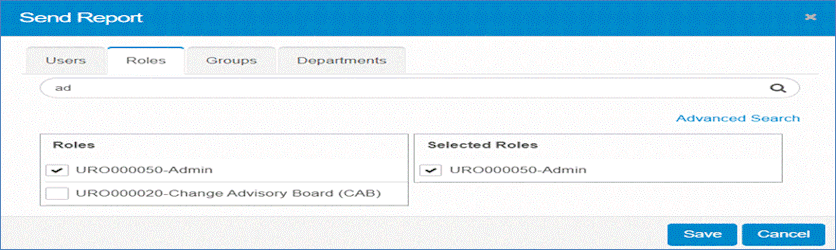
Click Add to select users, roles, groups, or departments for the scan report.
-
Email recipient list can be formed using all options meaning by selecting users and by selecting roles/groups and departments
-
Use the Search Bar to find users by name or ID.
-
Selected users will automatically appear in the Selected Users panel after you click the checkbox.
-
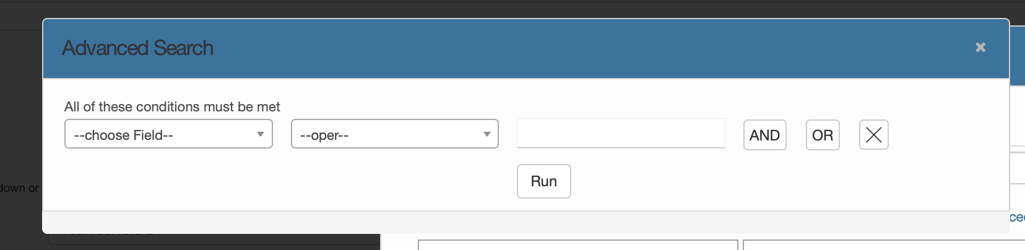
Use Advanced Search for detailed user filtering.
-
Select the Field to search by
-
Select operations
-
Select Value to search for within the selected field
-
Add Multiple Conditions by using AND / OR options
-
Click on Run to get the list of users/roles/groups/Departments that match the Criteria
-
Click the checkbox to add add users/roles/groups/departments to email list
-
-
-
Selected users will receive email notifications once the scan is complete.
-
Save your selection to confirm recipients or click Cancel to discard changes.
-
Starting the Scan
-
Once you complete all required fields, click the Run button at the top-right or bottom-right corner of the interface.
-
Clicking Run will initiate the scan and automatically redirect you to the Recent Scans page.
-
To check the scan status and view scan details, refer to the Recent Scans.
-