Import CI’s
Import CI without using existing Field Mapping Template
-
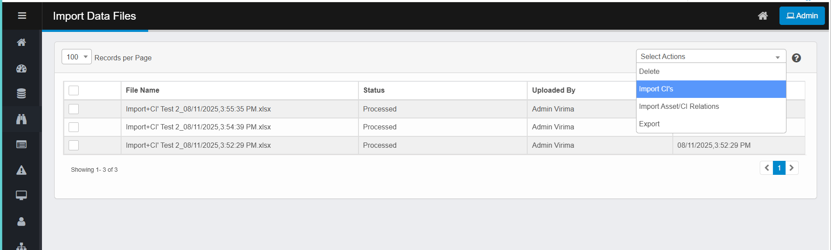
From the Select Actions menu, click Import CI's.
-
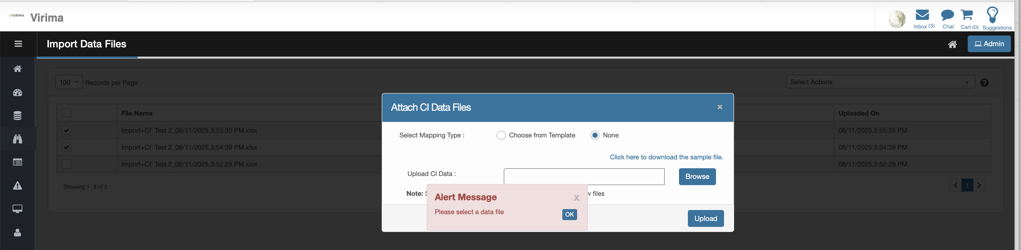
The Attach CI Data Files window appears, allowing you to proceed with uploading and mapping your configuration item data files.
-
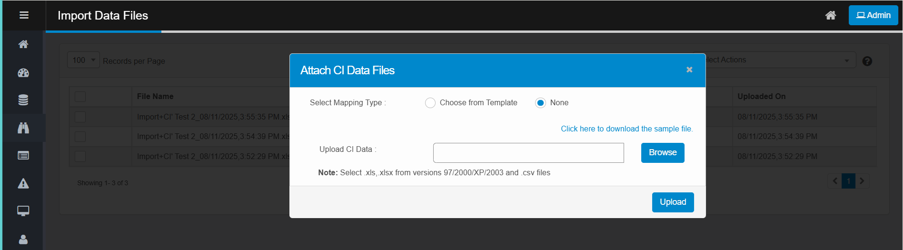
In the Attach CI Data Files window:
-
Select a mapping type as None
-
None – Import without a template.
-
-
Click Browse to select a file (.xls, .xlsx, or .csv).
-
(Optional) Download the sample template for reference.
-
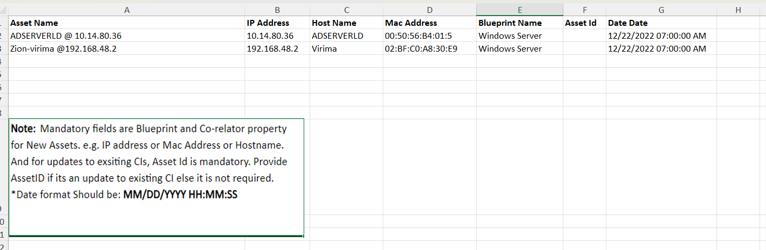
Expected Columns & What to Enter
-
Asset Name
The name of the asset (e.g., server host + IP). -
IP Address (possible correlator)
The host’s primary IP (e.g., 10.14.80.36). If your blueprint uses IP as a correlator, this helps match to an existing CI. -
Host Name (possible correlator)
Host name of the device (e.g., ADSERVERLD). Another common correlator. -
Mac Address (possible correlator)
Physical MAC address (e.g., 00:50:56:B4:01:5). Use standard notation and only one MAC per row. -
Blueprint Name (Mandatory)
The CMDB blueprint that defines the CI’s schema (e.g., Windows Server). Must exactly match an existing blueprint name. -
Asset Id (Mandatory only for updates)
The CMDB ID of an existing CI (e.g., AST003156). -
Acquisition Date
A datetime field for asset lifecycle. Format must be MM/DD/YYYY HH:MM:SS (e.g., 12/22/2022 07:00:00 AM).
Mandatory Import Rules
-
For New CIs:
-
Blueprint Name is required.
-
At least one correlator (IP Address, Host Name, or Mac Address, as defined by the blueprint) must be present.
-
-
For Updating Existing CIs:
-
Asset Id is required.
-
Correlators (IP, Host Name, MAC) help validate matches but are not strictly required if Asset Id is provided.
-
-
Date/Time Fields:
-
Must follow the format MM/DD/YYYY HH:MM:SS.
-
-
Click Upload.
-
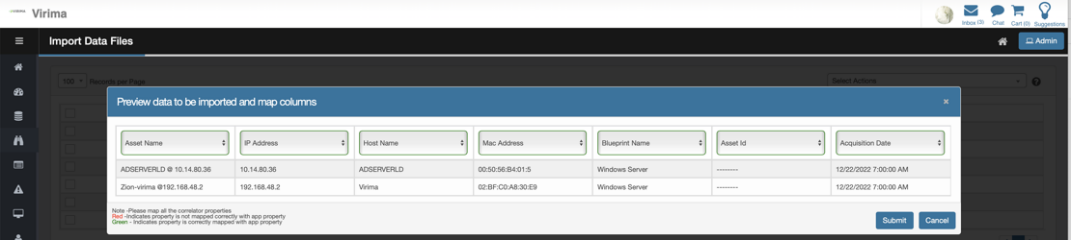
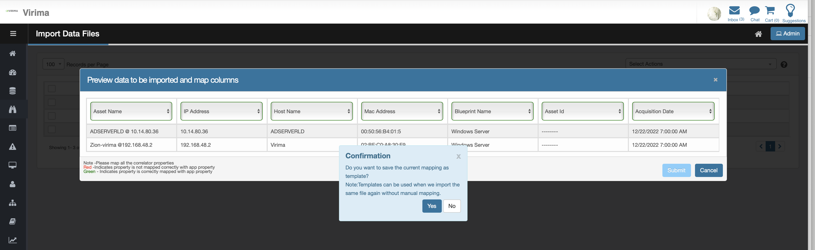
A preview of the data to import appears, showing how each attribute is mapped to the column headers in your sample file.
-
If the default mapping is incorrect, use the dropdown to change the attribute name.
-
Click Submit to proceed.
-
Ensure all correlator properties are mapped.
-
If a property is highlighted in red, it means it is not properly mapped to an application field; use Skip Column if you do not wish to map that property.
-
If a property is highlighted in green, it means it is successfully mapped to an application field.
-
-
If a record in your Excel (or CSV) import file does not have a value for the “Blueprint Name” column, that record will not appear in the Import Data Files.
-
If a record has a “Blueprint Name” but does not have any correlator (such as IP Address, Host Name, or MAC Address—as required by the blueprint), that record will also not be shown in the Import Data Files.
-
When prompted, a confirmation pop-up will ask if you want to save the current mapping as a template.
-
Click Yes to save the template.
-
Enter a name for your template in the pop-up and click Save and Continue.
-
You can reuse a saved field mapping template for future CI imports as long as the selected blueprint matches the blueprint associated with the template.
-

-
After import, a new row appears in the file list, displaying the imported file name, status, uploaded on, and uploaded by fields.
-
The system shows an error message if a user tries to upload without a file.
Import CI using existing Field Mapping Template
-
From the Select Actions menu, click Import CI’s.
-
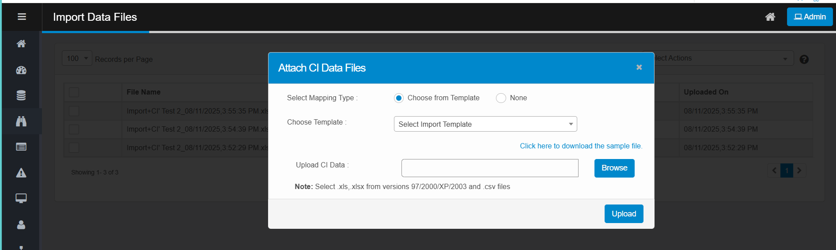
The Attach CI Data Files window appears, allowing you to proceed with uploading and mapping the configuration item data files.
-
In the Attach CI Data Files window:
-
Select a mapping type:
-
Choose Template – Use a predefined import template.
-
Click Choose Template, then select a template from the dropdown.
-
-
Click Browse to select a file (.xls, .xlsx, or .csv).
-
(Optional) Download the sample template for reference.
-
-
Click Upload.
-
If a user attempts to upload a file in an unsupported format such as .txt on the Import Data Files page, the system immediately rejects the file and displays an error message.

-
A preview of the data to import displays, with attributes mapped to column headers in the sample file.
-
Click the dropdown to change the attribute name if the default mapping is incorrect.
-
Click on Submit.
-
Ensure all correlator properties are mapped.
-
If a property is highlighted in red, it means it is not properly mapped to an application field; use Skip Column if you do not wish to map that property.
-
If a property is highlighted in green, it means it is successfully mapped to an application field.
-
A confirmation pop-up asks you to save the current mapping as a template.
-
Click Yes to save a template.
-
A pop-up prompts you to name the template.
-
Enter a name and click Save and Continue.
-
The system saves the template with the current mapping.
-
Use the saved template for future CI imports.
-
-
A new row is displayed with imported file name, status, uploaded on and uploaded by fields.
-
File Name: Displays the name of the uploaded Excel file.
-
Status: Shows the current state of the file (e.g., Processed, Processing).
-
Uploaded By: Indicates which user uploaded the file.
-
Uploaded On: Timestamp showing the exact date and time of the upload.
-
-
Review imported CIs in the detailed view before moving them into the CMDB.