New Business Rule
Use this function to accomplish tasks like automatically modifying the ITSM records or creating a new record based on action details when the trigger conditions are met. This reduces the manual effort of creating and updating the records.
Business rules can be set to run when the following actions occur: Add, Edit, and Add and Edit.
| 1. | In the main window, select Admin > Others > Business Rules. The Business Rules window displays. |

| 2. | From the Select Actions drop-down list, choose New Business Rule. The New Business Rule dialog box displays. |
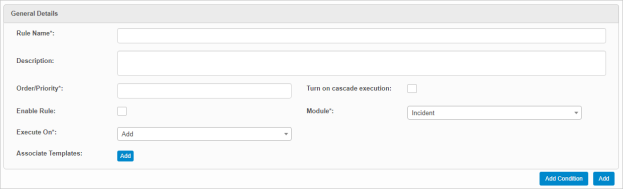
| 3. | In the Rule Name field, type a rule name to be shown in the Rule name box. |
| 4. | In the Description field, type details for this rule. |
| 5. | In the Order/Priority field, type the order in which this rule should be executed when there are multiple rules set for the selected module. |
| 6. | To execute the next enabled business rule based on the Order/Priority for the same module, check Turn on cascade execution. |
| 7. | To enabled (or disable) the rule, check (or uncheck) the Enable Rule option. |
| 8. | In the Module field, click the drop-down list, select the name of this module for which the rule applies. |
| 9. | To specify the type of action performed, in the Execute On field, click the drop-down list and select the applicable action. |
| 10. | To associate a template, click Add for the Associate Templates field option. The Associate Templates or Blueprints dialog box displays. |
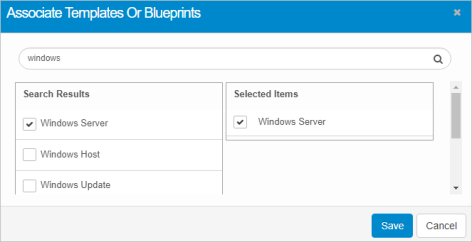
| 11. | Search for and select the applicable |
| 12. | When returning to the New Business Rules window, click Save. |
| 1. | In the main window, click the gear icon and select Others > Business Rules. |
| 2. | Click New Business Rule. The new Business Rule dialog box displays. |
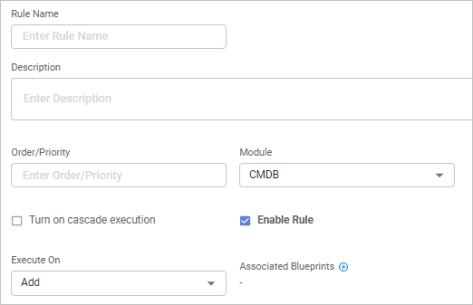
| 3. | In the Rule Name field, type an identifying name to be shown in the Rule name box. |
| 4. | In the Description field, type information about this rule. |
| 5. | In the Order/Priority field, type the order in which this rule should be executed when there are multiple rules set for the selected module. |
| 6. | In the Module field, click the drop-down list, select the name of this module for which the rule applies. |
| 7. | To execute the next enabled business rule based on the Order/Priority for the same module, check Turn on cascade execution. |
| 8. | To enabled (disable) the rule, check (uncheck) the Enable Rule option. |
| 9. | To specify the type of action performed, in the Execute On field, click the drop-down list and select the applicable action. |
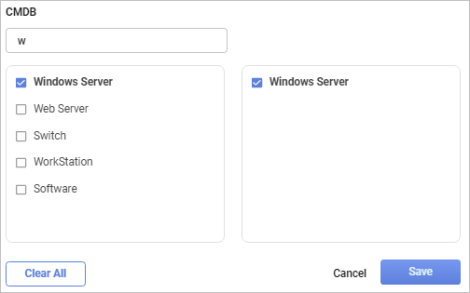
| 10. | To associate a blueprint, click the plus + sign next to the Associated Blueprints field. The CMDB dialog box displays. |
| 11. | Search for and select the applicable |
| 12. | When returning to the New Business Rules window, click Save. |
![]()
Use this function to apply a set of conditions to the business rule.
When adding a condition, the following applies:
|
The Rule Name field must have an entry to enable the Add Condition button. |
| 1. | In the New Business Rule dialog box, click Add Condition. |
| 2. | Configure the Trigger Conditions, Action Details and Notification settings (as described below). |
| 3. | When all selections/entries are made, click Save. |
| 1. | Under Trigger Condition Details, do the following: |

| 2. | Select Ignore Conditions to disregard all the conditions configured. |
| 3. | In the Property field, click the drop-down list and select the property for which you want to apply to the property. |
| 4. | In the Operator field, click the drop-down list and select the type of action to perform on the triggered condition. |
| 5. | Enter the applicable value for the condition. |
| 6. | To add multiple conditions, click the plus + icon. |
| 7. | To add multiple conditions, click “and” or "or” button. |
| 8. | When all selections/entries are made, click Add Condition. |
| 9. | To remove a condition, either click Delete Condition or the trashcan icon at the end of the row for a condition. |
|
The Action Type determines what additional fields display. |
| 1. | In the Action Type field, click the drop-down list and select the applicable type. Based on this selection, the remain fields change. Refer to the table below for more details on the Action Type and its corresponding fields. |

| 2. | To add multiple actions, click the plus + icon. |
| 3. | To remove an action, click the minus - icon. |
| 4. | When all selections/entries are made, click Add Action. |
| 5. | To remove the Action Details block from the window, click Delete Action. |
| Deleting is a permanent action and cannot be undone. Deleting may affect other functionality and information in the application such as data in configured reports, fields in windows, selectable options, etc. Therefore, be sure to understand the potential effects before making a deletion. |
| 1. | Click the line that contains the item to delete. |
| 2. | From the Select Actions drop-down list, choose Delete. If a confirmation message is displayed, type Delete and click Deleteto confirm. |
Action Type Fields
| Action Type | Fields |
|---|---|
| Update the triggered record | Property, Operator and Value |
|
Create new record |
Target Module, Create from Model, Property, Operator and Value |
|
Move Record |
When the module is Discovery, moves the records from Discovery to CMDB. |
|
Delete the triggered record |
N/A |
|
Create task in triggered record |
Property, Operator and Value |
|
Survey notification |
When the module is Incident, Change, Release/Request/Problem in Business rule, a survey is sent to the Assignee, Reporter, and Stake Holders of the record. |
|
No action |
N/A |
|
"Process" Action Types |
N/A |
|
"Copy To" Action Types |
N/A |
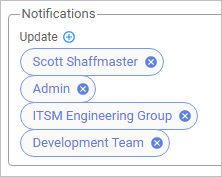
| 1. | Click the plus + sign next to the Update text. |
| 2. | Click the type of list to search (such as USERS, ROLES, and so forth). |
| Selections can be made of each type to designate all who need to receive a notifcation when an action takes place. |
| 3. | Enter the search criteria and press Enter. See also Advanced Search. |
| 4. | Select choices from the results list, moving to the selected list. |
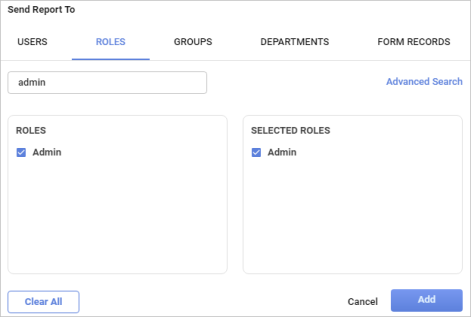
| 5. | When all selections/entries are made, click Add. The window is updated and displays all the selected notifications. |